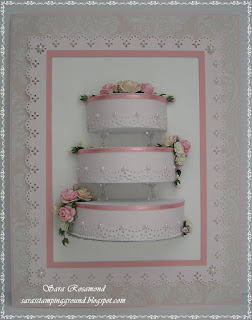
This is the Wedding card I have made for my friend Jane to give her Son and future Daughter-In-Law for their upcoming nuptials.
I had made a smaller version of this card a couple of times but decided to go BIG this time for more impact.
The overal card size is 10" x 8" and I`ve used the largest of the three nestie circles to determine the size of the wedding cake tiers.

I have used no template for this, the whole thing was made entirely by hand by cutting and measuring each layer and dividing the size of each layer by the overal size of the card to make sure it was perfectly central.

I started by cutting three largest nestie circles and dividing each of those in half to create the top and bottom of each cake layer.
I then had to measure the circumference of each layer to determine how wide the sides needed to be.
Then the holes needed to be punched in the bottom of the top layer, top and bottom of the middle layer and top of the bottom layer to thread the wire through for each column of crystals to create the support for the layers. These had to be dead acurate so they would line up and the wire would thread through easily. I even got my pertractor out for this one, a tool I haven`t used since my school days !! lol!

This is the top view looking down the cake, I had to make sure they were centralized or they would have looked wonky, the only way to do this was to measure each layer, width, length and depth and take that measurement away from the size of the width and depth of the card and divide by two to get them in the centre. I have never used so much Math to make a card before, my poor brain was very taxed but the end result was worth it.

I thought if I just stuck the layers on the card the weight of them would eventually pull them away from the card and unstick them, so I made the sides of the cakes longer than the tops and bottoms so I could push them through the backing card and fix them on the back, again more measuring to get them acurate but it made for a much sturdier cake which will stand the test of time hopefully.
The crystals were wired through the cake layers which was fiddly but had to be done prior to threading the layers through the slits cut in the backing card.The top of the top layer and bottom of the bottom layer were glued on last after securing the wires, very fiddly and I had to sit holding them together until the glue set !

I used Martha Stewart doily lace for the "icing" decorating the cake and little SU pearls at each scallop.
The ribbon is woodware pink 3mm satin and the flowers are from Hobby House, the flower stalks were a bit too heavy so I cut them off and threaded thinner wire through them to create the little bouquets to tumble down the sides of the cake, I`ve stuck them with collal 3D silicone which is the BEST silicone I have ever used, dries quick and vertually no smell. I put a half large scallop nestie circle on the bottom of the cake cut from silver mirri board to act as the "cake board" for the base. Then the outside frame was created with Martha Stewart eyelet lace punch around the page set, the backing paper is Paper Mania - Regency which I thought looked sort of weddingy.
I am very pleased with the outcome of the card, I`m not sure the photos do it justice it is quite large and creates quite a wow factor with the 3D layers,the bottom layer stand out 2 and a half inches from the card !
It was a serious labour of love but it`s very rare I get to make wedding cards and I really enjoyed this one.
I had a sort out of all my craft stash recently and came accross a cross stitch that I started about 5 years ago and never finished so I have been doing that for the last week and I`m off now to do some more to it !
Bye for now and happy crafting xxx


